
Now that we understand a little better how all the different components of a web app fit together let’s set up the development environment. I don’t intend to give a long article listing every command that you need to key in to install npm, React, Node, etc. Instead I’ll link to the appropriate documentation pages and focus on how everything will need to work together.
Just to make things explicit I am assuming that you will need to set up a development environment for a solo full stack developer on a personal computer (Mac, Windows, or if you’re a bit special: Linux).
Where will you host?
Before you run off to install anything you should start by thinking about where you will host your app once you’ve completed it. This could impact some of your decisions for your development environment. Do you have your own web hosting service? Are you developing for a client who has certain technology constraints? It’s best to think about this now instead of trying to migrate to a different database towards the end of your development cycle – an hour or two now will save you many days or weeks later on!
Questions you should ask at this time include:
- What database will you use?
- What versions of Node.js are available on your API server?
- Is this a small prototype app for your own needs or will this be rolled out to a large number of users?
- How much do you plan to spend on hosting?
- Are you creating just one app or will this be the first of many?
- Do you have your own domain and does that domain registrar provide a hosting service?
In my case I use Namecheap to host my domain. Their hosting service is based on cpanel and includes an option to set up Node.js apps. It also includes a number of MySQL databases. So that drove my decision to use MySQL for some of my personal web apps.
Start installing!
Now that we know what we will install let’s get to it! We’ll install npm, the package manager. This tool makes it easy to install the various packages and libraries that you will need to both React and Node later on. It’s included when you download and install Node.js from their site. I suggest that you start with the Node Getting Started Guide for instructions. The Node server will be our API server.
The getting started guides will often use the default port of 3000 for the Node server. However, the Create React App development environment uses 3000 by default too for its webserver so you’ll need to change the Node server’s port to a different number. You can use almost anything you want. I’ve used 3001, 4000, or 8080 for the Node server. It doesn’t really matter as long as it doesn’t clash with any other services you are running on your computer.
Next create a single page React project by following the Create React App instructions. The default port for testing the React app is 3000 so you’ll open http://localhost:3000 to view and test your app.
The database
This is probably where there’ll be the most opportunity for variations. I downloaded MySQL Community Server and then installed MySQL on my laptop by following these Getting Started instructions. By default the MySQL server uses port 3306. I’d also recommend installing MySQL Workbench to help with creating, viewing and managing your databases.
Another option would be to use a cloud-based database server. For example you can set up a free MongoDB Atlas trial database. One advantage of using a cloud-based database is that you could continue to use it even after you’ve hosted your code in your production environment.
Other tools
You’ll probably want to use your favourite IDE (Integrated Development Environment) or Editor to edit your source code. There’s many different options here and a lot of it is down to personal preferences. Similarly you’ll probably want to install git to manage your source code and files.
Two other tools that are more specific to web app development are Postman and React Chrome Extension. Postman allows you to send and receive requests directly to your API server so that you can check if your APIs are behaving as expected. The React Chrome Extension allows you to inspect your React app in the browser, showing you the React components and investigate their state, etc. Both tools will help you a lot when you are testing and debugging!
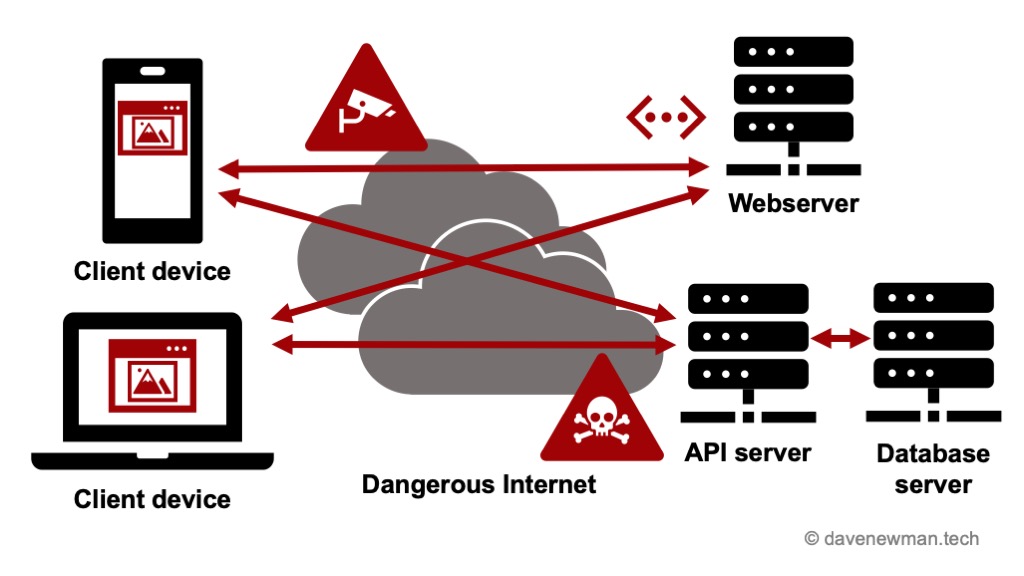
How does this match up with the architecture diagram?
As a reminder let’s look at the detailed web app architecture diagram from the previous article:
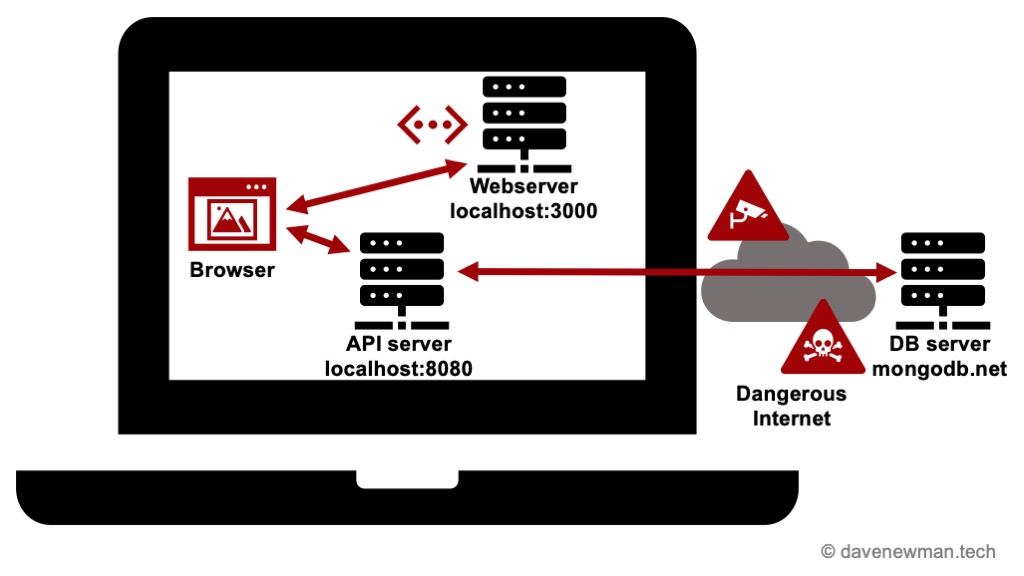
This is what all the components of our web app with a local database look like in our development environment:

The first thing to note is that all of the services run on our local machine (our personal computer). The webserver is running on port 3000 (the default when using Create React App). In this example I’ve got the Node API server running on port 8080. This in turn accesses the MySQL database server which is running on port 3306. Assuming that all the CSS and Javascript files that your app needs are served from your local webserver (localhost:3000) and not from a CDN (Content Delivery Network) then you could unplug from the Internet and continue developing and testing.
If you’re using a cloud-based database server then the components would look like this:
In this scenario the webserver and Node API server are the same as before. However, the API server now connects with a database server that is hosted outside of our computer. Accessing this database is usually slower than a local database and you’ll only be able to test your app when you’re connected to the Internet.
What are the limitations of the development environment?
Now that we have set up the development environment then our production (or staging) environments will be the same, right? Not quite! The development environment is configured so that we can see debugging messages and is not intended to be secure. By default it is set up so that only the browser on our local machine can access the webserver making testing with another device difficult. For example, we will want to test with a mobile phone.
There are other gotchas too. The development environment assumes that the webserver is hosting the files for the web app in the root directory. And similarly the Node API server assumes that it is also running in the root directory. This means we’ll have to make changes to both the React app and the Node server if we want to host them in subfolders on the same server. I’ll cover this in a future article. We may also want to host our servers on a HTTPS secure server which is difficult to test on our local machine.
Finally our development environment is set up and we understand how the different components match up with our web app architecture! In the next article we’ll look at hosting our web app in a production environment.