
Recently I decided to spend a little time working on virtualisation. I don’t mean to say that I’m trying to make myself disappear from reality… but I did want a setup that more closely matched my production environment so that I can do more testing before uploading to my hosted servers.
I had an old Dell Latitude E7250 laptop that wasn’t being used so I decided to install Proxmox on it to try out virtualising my staging environment. Proxmox Virtual Environment is an open source server virtualisation management solution and is usually installed on servers or dedicated desktops. However, I didn’t have a desktop at home and wanted to try Proxmox out before buying anything. Hence the decision to install Proxmox on a laptop.
There are few things to consider when installing on a laptop. Proxmox is usually run on a “headless” server, in other words a server without a monitor. It is usually accessed by a web management interface from another device. This posed a problem when running Proxmox on the laptop as it never powered down the laptop’s screen. It also posed a problem when sleeping when the laptop’s lid was closed. We’ll address both of those issues below.
Before you start
It goes without saying that when you install Proxmox it will wipe anything on the laptop’s boot disk. So backup anything that you may need before you start!
The next step is to prepare your network. In my router’s settings I gave my laptop a fixed IP address in the DHCP server options using the laptop’s MAC address. I also took this opportunity to use a domain name for my LAN. After a lot of reading I decided to use int.mydomain.com (for a domain that I own) instead of using a made-up name like mydomain.local . It seems that .local extensions may give issues with Apple devices. The “int” in the name refers to “internal” so that it won’t clash with any machines hosted externally for that domain. Now I can access any of my devices within my network using names such as mycomputer.int.mydomain.com instead of remembering IP addresses.
Another thing to consider is that Proxmox requires a wired network (not wifi). My Dell Latitude laptop has a built in ethernet port so that’s the way I’ll connect it to the network.
Create a boot USB and install Proxmox
Now it’s just a simple task of going to the Proxmox website to download the installation iso. Using Rufus you can create a bootable USB drive with that iso. I did face a few challenges getting the Dell laptop to boot from the USB drive. In the end I had to change the Bios bootup options to UEFI instead of Legacy. Once this was done then the laptop booted into the Proxmox installation wizard and it was a straight-forward process of following the installation steps. This was where I entered in the fixed IP address and network domain name that I had configured in my router beforehand.
I then followed the instructions from Serve The Home to update Proxmox without a subscription.
Prevent the laptop from sleeping when closing the lid
Finally we’re at the section where we need to make changes specifically as we are using a laptop. Proxmox provides a web interface for creating and managing your VMs. So by default you don’t need to use the laptop’s screen, you’ll need to access the web interface from another device. If you’re using a server or a desktop with a separate monitor you can just unplug the screen or switch it off. However, you can’t do that with the laptop’s screen.
The first step is to stop the laptop from sleeping when closing the lid. To do this we need to add in a couple of lines into the logind.conf file.
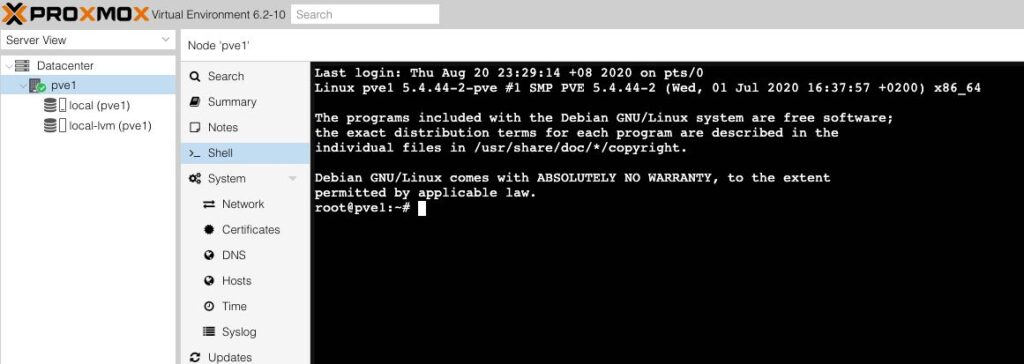
1. In the web interface click on your node and then go to the “Shell” tab.
2. Edit /etc/systemd/logind.conf (I use the vi editor so I just typed “vi /etc/systemd/logind.conf”).
Add in the following 2 lines in the file (use “i” key to get into “insert” mode to start typing in vi):
HandleLidSwitch=ignore
HandleLidSwitchDocked=ignore
3. Save the file and exit (ESC then “:wq”).
4. And finally restart the service by typing the following at the Shell command point:
systemctl restart systemd-logind.service
Now we can happily close the laptop’s lid and the laptop will not go to sleep. However, I did notice that the screen remained switched on even when the lid was shut. Which reminded me to check whether the fridge light goes off when you close the door…
Switch off the screen after 5 min
The next thing we’ll need to change is to switch off the screen (regardless of whether the lid is open or closed). Eventually I found the following instructions which I’ll repeat here.
1. Go to the Shell tab of your node (as above).
2. Edit /etc/default/grub (“vi /etc/default/grub”).
Change the following line to read:
GRUB_CMDLINE_LINUX="consoleblank=300"
The “300” is the number of seconds before the screen goes to sleep. I chose 300 seconds (5 minutes).
3. Save the file and exit (ESC then “:wq”).
4. Then restart so that it sets it in place by typing the following in the Shell:
update-grub
That’s it! Installed Proxmox on your laptop
And that’s all there is to it! Now we have the Proxmox virtualisation environment installed and running on our laptop ready to host our virtual machines.
12 replies on “Installing Proxmox on a laptop”
Thank you for this!
I found a command to mask the laptop lid closing command (systemctl mask sleep.target suspend.target hibernate.target hybrid-sleep.target) which did stop the laptop falling asleep when the lid was closed.
But then discovered the systemd-logind process was using a high amount of CPU power trying to shut down the laptop anyway. It was failing in the log with:
“systemd-logind[846]: Failed to execute operation: Permission denied”.
Must have been hammering away at it 100’s if not 1000’s of times a second to produce that much CPU usage.
Oops! Looks like you did some good investigation work there! Glad that this post helped you.
Awesome, thanks.
Been wanting to try proxmox on a laptop to run home assistant, but it kept going to sleep and shutting down my house….
Cant wait to give it a try
Glad that this helps!
Thanks! Just wanted to do it for giggles and add a OS with with an external drive for a NAS and to play around.
Good thing to note is that if you’re using the combination of EFI and ZFS then systemd-boot is used instead, so you should edit the `/etc/kernel/cmdline` and add `consoleblank=300`, then run `proxmox-boot-tool refresh` to update the bootloader.
See the wiki for more details: https://pve.proxmox.com/wiki/Host_Bootloader
Wow – thank you so much! Very helpful.
Just stopped by to let you know that this article really helped me in resolving this issue. You are a life saver 🙂
I am glad to find this hidden gem in the internet, really helped me to setup my fedora laptop as small homelab,
Thanks
Convenient summary, exactly what I needed. And for users struggling with editing files using vi, try nano. I found it to be a bit more user-friendly.
After installing proxmox on a laptop, you can then install a window manager – eg XFCE4 and a web browser – Firefox-esr or Chromium and access the Proxmox web management interface from within the laptop … no other device is needed ….
Thank you for this – I’ve just repurposed an aging Dell laptop so I can learn Proxmox, and your instructions were just what I was looking for.